


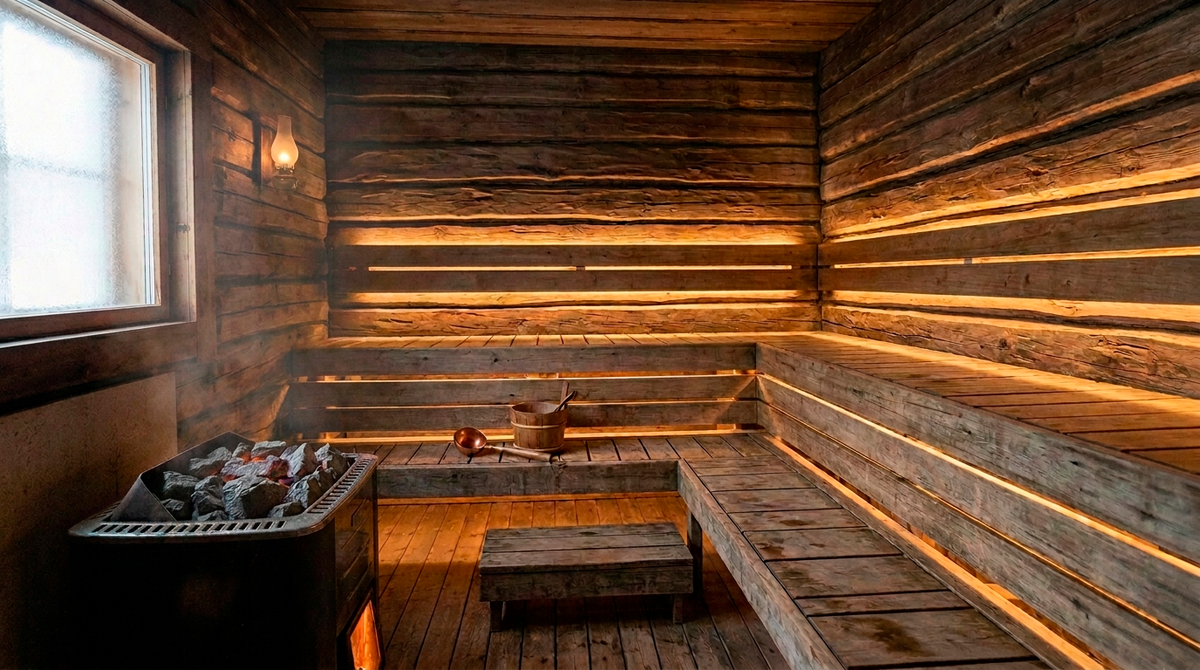
Whether you're renovating a family sauna that's been in use for decades or simply want to enhance the ambience of your weekend retreat, a lighting upgrade can transform the entire experience. Modern LED solutions offer not only improved visibility but also the ability to create different moods—from bright, energising light for cleaning to soft, relaxing tones for evening sessions. The key is understanding that today's retrofit options are designed specifically for homeowners who want professional results without professional-level construction work.
How is a sauna lighting retrofit done?
A sauna lighting retrofit doesn't require removing wall panels or running electrical cables inside walls. When the goal is to update your sauna lighting with minimal disruption, the best approach is to utilise existing pathways and introduce light sources indirectly. In practice, new light strips are typically installed beneath benches or behind backrests, where light reflects gently off the wood surfaces without creating glare for bathers.
This surface routing works smoothly because modern lighting kits use low-voltage 12V or 24V systems. Low voltage makes installation safe in humid environments and allows for discreet, thin cabling. Wires can be run inconspicuously behind bench structures or corner trims without the need for wall channelling. For safety, the transformer is typically positioned on the dry side of the wall or below the benches in a splash-proof enclosure, keeping it away from direct moisture exposure.
Surface cabling typically uses heat-resistant silicone cables that won't become brittle in hot air. When cables are routed beneath bench structures, they remain protected from direct steam and the hottest vapour. This is particularly important in European saunas where temperatures regularly exceed 80°C during use. If you want to complete your sauna lighting retrofit entirely without an electrician, there are ready-made kits available with plug-and-play connections. However, for a more permanent and integrated solution, having a qualified electrician handle the transformer connection allows you to integrate the lighting into your home's broader lighting control system, potentially connecting it to smart home platforms.
Wireless control eliminates the traditional challenge of positioning light switches. By using a wireless dimmer, you avoid running new switch cables through walls. A battery-powered or magnetically mounted controller can be installed anywhere—beside the sauna door, in the changing room, or even outside the sauna entirely. This saves installation time and enables you to dim the light intensity according to your needs, whether you want bright light for cleaning after use or a gentle glow during evening relaxation. For straightforward upgrades, complete LED kits designed specifically for saunas are a practical choice, containing all necessary components to ensure compatibility and speed up installation.
When planning your retrofit, consider the bench layout carefully. Most European home saunas have either an L-shaped or U-shaped bench configuration. The underside of the upper bench provides an ideal location for LED strips, as it creates ambient lighting that illuminates the entire sauna without shining directly in anyone's eyes. For saunas with a simple two-tier straight bench, mounting LED strips behind the backrest at shoulder height creates a pleasant backlit effect. COB LED strips work particularly well for sauna retrofits because they provide continuous, dot-free illumination that looks more sophisticated than traditional LED strips with visible individual diodes.
Can you install LED strips on the sauna ceiling?
The ceiling area is the most challenging location for electronics in a sauna, as hot air naturally rises. Standard LED strips begin to deteriorate quickly when exposed continuously to temperatures above 80°C. Near the sauna ceiling, temperatures often reach 100-120°C, which exceeds the tolerance of ordinary LED components. Direct installation on the ceiling surface without appropriate protection typically leads to premature failure of the lights.
When designing durable overhead lighting, two main factors must be considered: heat dissipation and moisture protection. Components intended for sauna ceiling areas must have high heat tolerance (typically at least 105°C) and a minimum IP67 moisture protection rating. IP67 certification ensures the LED strip is dust-tight and can withstand temporary immersion in water, meaning it won't be damaged by condensing steam or splashing water during löyly throws.
When selecting LED strips for the ceiling area or its immediate vicinity, high-quality strips alone aren't sufficient. The heat generated by the diodes must be able to dissipate freely. If you simply stick an LED strip directly onto a wooden surface, the wood acts as an insulator, trapping heat inside the strip and causing the connection points and diodes to burn out prematurely. An aluminium mounting profile not only provides a clean, finished appearance but also serves as an essential cooling element. The profile efficiently conducts heat away from the diodes, preventing them from overheating.
In practice, many experienced sauna renovators recommend using 45-degree corner profiles when installing LED strips near the ceiling junction. These profiles direct light downward and outward whilst the aluminium body faces away from the hottest air layer. For ceiling installations, profiles with opaque diffusers work best, as they prevent individual LED dots from being visible and create a smooth, even light distribution. The diffuser also provides an additional layer of protection against moisture.
The longest-lasting and most trouble-free sauna lighting is often achieved by positioning LED strips slightly lower, such as behind the backrest or beneath the upper bench. This creates pleasant reflected light and protects components from the hottest air. In indirect installations, strips are often placed behind a downward-facing lip or ledge. This way, hot steam doesn't condense directly on the profile surface, and light spreads gently throughout the space via the wall surfaces, creating the soft, diffused glow that makes sauna sessions so relaxing.
For those planning a comprehensive retrofit, consider creating multiple lighting zones. For example, you might install one set of LED strips beneath the upper bench for general ambient lighting, and another set at floor level to illuminate the pathway to the door—particularly useful during evening sauna sessions when entering from a darkened changing room. This layered approach to lighting not only enhances safety but also allows you to create different atmospheres depending on the time of day and your mood.
What temperature rating do sauna LED strips need?
Temperature tolerance is the critical specification when selecting LED strips for sauna retrofits. Standard LED strips sold for general home use are typically rated for ambient temperatures up to 50-60°C—perfectly adequate for under-cabinet kitchen lighting or bedroom accent lighting, but wholly inadequate for sauna environments. In a properly heated sauna, the temperature at bench level commonly reaches 80-90°C, whilst the ceiling area can exceed 100°C.
Look for LED strips specifically rated for sauna use, which should tolerate continuous operation at temperatures of at least 105°C. This rating provides a safety margin for those occasions when your sauna runs particularly hot or when you've positioned the strips closer to the ceiling than originally planned. The temperature rating applies not just to the LED diodes themselves but to the entire assembly, including the circuit board, solder joints, and any adhesive backing.
It's worth noting that temperature ratings can be ambiguous in product specifications. Some manufacturers list the maximum ambient temperature, whilst others specify the maximum temperature at the LED junction point. For sauna applications, you want the ambient temperature rating—this is the air temperature surrounding the LED strip. If specifications seem unclear, contact the supplier directly to confirm the strip's suitability for sauna installation.
Beyond the LED strip itself, the power supply (transformer) should never be located inside the sauna cabin. Always position it in the changing room, adjacent utility space, or beneath the sauna benches in a properly ventilated, splash-proof enclosure rated for the expected temperature and humidity levels. Quality transformers designed for sauna use include thermal protection that automatically shuts down the unit if it overheats, preventing damage and potential safety hazards.
Choosing the right colour temperature for sauna lighting
Colour temperature dramatically affects the atmosphere in your sauna. Measured in Kelvin (K), this specification describes whether light appears warm (yellowish) or cool (bluish). For sauna environments, warm colour temperatures between 2700K and 3000K are universally preferred, as they complement the natural wood tones and create a relaxing, cosy atmosphere reminiscent of traditional candle or fire light.
In European homes, where saunas are primarily used for relaxation rather than purely functional bathing, the warm glow of 2700K LED strips creates the perfect ambience for unwinding after a long day. This colour temperature enhances the golden and amber tones in the wood whilst being gentle on the eyes during extended sauna sessions. Some enthusiasts even prefer going as low as 2200K for an ultra-warm, almost amber glow, though this can make it harder to see clearly when cleaning or performing maintenance.
Colour temperatures above 3500K, whilst offering better colour rendering and brighter perceived light, tend to feel clinical and institutional in a sauna setting—more reminiscent of a gym changing room than a private wellness retreat. If you're upgrading a sauna in a holiday home or rental property where the sauna might be used by different people with varying preferences, installing dimmable LED strips gives users the flexibility to adjust brightness whilst maintaining the warm colour temperature.
For those seeking the ultimate in lighting flexibility, dim-to-warm LED technology offers an intriguing option. These systems automatically shift to warmer colour temperatures as you dim them, mimicking the behaviour of traditional incandescent bulbs and creating an even cosier atmosphere at lower light levels. Whilst more expensive than standard LED strips, dim-to-warm downlights can be an excellent complement to LED strip lighting, particularly when positioned above the sauna door or in the ceiling of a larger sauna cabin.
Installation profiles: why they matter for sauna retrofits
Whilst it might be tempting to save money by mounting LED strips directly to wooden surfaces using their adhesive backing, this approach almost guarantees premature failure in sauna environments. Aluminium LED profiles serve three essential functions that become critical in high-temperature applications: heat dissipation, physical protection, and professional appearance.
Heat dissipation is perhaps the most important function. LED strips generate heat during operation—not as much as traditional incandescent bulbs, but enough to cause problems when that heat can't escape. In a sauna retrofit, where ambient temperatures already push components to their limits, any additional heat from the LEDs themselves can be the difference between a lighting system that lasts ten years and one that fails after ten months. Aluminium profiles draw heat away from the LED strip through conduction, spreading it across a larger surface area where it can dissipate into the surrounding air.
Surface-mounted profiles are the most straightforward option for sauna retrofits, as they simply screw or clip onto the wooden surface without requiring any cutting or routing. These work well beneath benches or along the junction between the bench and the wall. For a more refined look, recessed profiles can be set into routed channels in the wood, though this requires more advanced woodworking skills and may not be practical when working with existing, finished sauna interiors.
The diffuser cover that clips onto the profile serves multiple purposes beyond simply hiding the individual LED dots. It protects the LED strip from physical damage—important in saunas where whisks, towels, and other accessories are frequently moved about. The diffuser also provides an additional barrier against moisture, particularly important for installations near areas where water is thrown onto the heater stones. Opt for diffusers made from polycarbonate rather than acrylic, as polycarbonate maintains its clarity and structural integrity at higher temperatures.
When selecting profiles for your sauna retrofit, measure carefully and order slightly longer sections than you think you'll need—cutting aluminium profiles to length is straightforward with a hacksaw, but extending them requires additional connectors that can compromise the clean appearance. For installations that turn corners, dedicated corner connectors are available for many profile systems, creating seamless 90-degree angles without visible gaps.
Planning cable routes for minimal visual impact
One advantage of retrofit installations is that existing sauna structures often provide natural pathways for routing cables discretely. The space beneath bench seats, the gap where the backrest meets the wall, and the junction between wall panels and the floor all offer opportunities to run cables out of sight. When planning your retrofit, spend time examining your sauna's construction to identify these routes before purchasing materials.
Low-voltage cables (12V or 24V) are inherently safer than mains voltage wiring, which is why many sauna LED systems use them. This doesn't mean you can be careless with installation, but it does mean you have more flexibility in routing. Silicone-insulated cables rated for high-temperature applications remain flexible even after years of heat cycling, whereas standard PVC-insulated cables can become brittle and crack. The difference in cost is minimal, but the difference in longevity is substantial.
For cables that must cross visible areas—such as running from the transformer location to the first LED strip—consider using cable channels or conduits that match your sauna's wood species and finish. Many sauna retrofit specialists use slim, wooden cable channels that blend seamlessly with the wall panelling. These can be stained or oiled to match the existing wood, making them virtually invisible unless you're specifically looking for them.
If your sauna has a traditional electric heater with its own dedicated electrical supply, you may be able to tap into this circuit for your lighting power supply—but this should only be done by a qualified electrician who can ensure the circuit has adequate capacity and that appropriate safety devices are in place. Never attempt to connect lighting to the heater circuit yourself unless you have the necessary qualifications and certifications.
Common mistakes to avoid in sauna lighting retrofits
Even with the best components and careful planning, several common mistakes can compromise your sauna lighting retrofit. Being aware of these pitfalls helps ensure your upgrade delivers years of trouble-free service.
The most frequent error is using standard LED strips not rated for high-temperature applications. It bears repeating: general-purpose LED strips designed for home accent lighting will fail in a sauna environment. Always verify the temperature rating before purchasing, and don't rely on vague marketing claims like "suitable for bathrooms"—bathrooms, even steamy ones, rarely exceed 40°C, far below sauna temperatures.
Another common mistake is insufficient heat sinking. Even when using appropriate high-temperature LED strips, mounting them directly to wood without an aluminium profile will dramatically shorten their lifespan. Wood is an excellent thermal insulator, which is exactly what you don't want when trying to dissipate heat from LEDs. The modest additional cost of proper profiles is invariably worth it when measured against the alternative of replacing failed LED strips every year or two.
Oversizing the lighting installation is surprisingly common, particularly among first-time retrofitters who worry about insufficient light. Saunas don't require bright illumination—in fact, overly bright lighting works against the relaxing atmosphere you're trying to create. As a general guideline, 50-100 lumens per square metre is ample for most saunas. A typical 2x2 metre sauna (4 square metres) needs only 200-400 lumens total—easily achieved with a single 2-metre run of moderate-output LED strip.
Neglecting moisture protection around electrical connections is another potential problem. Whilst the LED strips themselves may have high IP ratings, the connection points between strips, the connection to the power supply, and any in-line switches or controllers are often the weak points. Use proper IP-rated connectors rather than simply twisting wires together and covering them with electrical tape. Heat-shrink tubing provides good moisture protection for joints and should be standard practice in sauna retrofits.
Finally, many retrofitters fail to consider maintenance access. LED technology is remarkably long-lasting, but transformers, controllers, and connectors may eventually need replacement. Design your installation so that key components can be accessed without dismantling the entire system. For instance, position the transformer somewhere you can reach it without removing bench panels, and use clip-in profiles rather than permanently bonded installations where practical.
Testing and commissioning your new sauna lighting
Once your sauna lighting retrofit is complete, proper testing ensures everything functions safely and correctly before you heat the sauna to full temperature. Start with a visual inspection of all connections, verifying that they're secure and properly insulated. Check that LED strips are firmly mounted in their profiles and that profiles are securely attached to the sauna structure.
With the power supply connected but the sauna cold, test the lighting system. Verify that all LED strips illuminate evenly without dark spots or flickering. If you've installed a dimmer or wireless controller, test the full range of dimming to ensure smooth operation without buzzing or abrupt changes in light level. This cold testing helps identify any installation errors before subjecting the system to heat stress.
Next, conduct a heat test by running your sauna through a normal heating cycle without using the lighting. This allows you to verify that the sauna heater is functioning correctly and gives you a baseline for how the sauna behaves. Then, perform a test with both the heater and lighting operating together. Monitor the lighting during the heat-up phase and whilst the sauna is at full temperature. LED strips should maintain consistent output without colour shifting or dimming, which would indicate heat stress.
After several heating cycles, inspect the installation again. Look for any signs of heat damage such as discoloured cables, melting adhesive, or warping of plastic components. Check that screws and fixings remain tight—wood expands and contracts with temperature and humidity changes, which can sometimes loosen fixings over time. Any issues identified during this commissioning phase are much easier to address before the installation is considered complete.
Document your installation with photographs and notes about component specifications, cable routing, and any peculiarities of your specific setup. This documentation proves invaluable if you need to troubleshoot issues years later or if you decide to expand or modify the lighting in future. Store this documentation outside the sauna, as paper records won't survive the humid environment.


0 comments